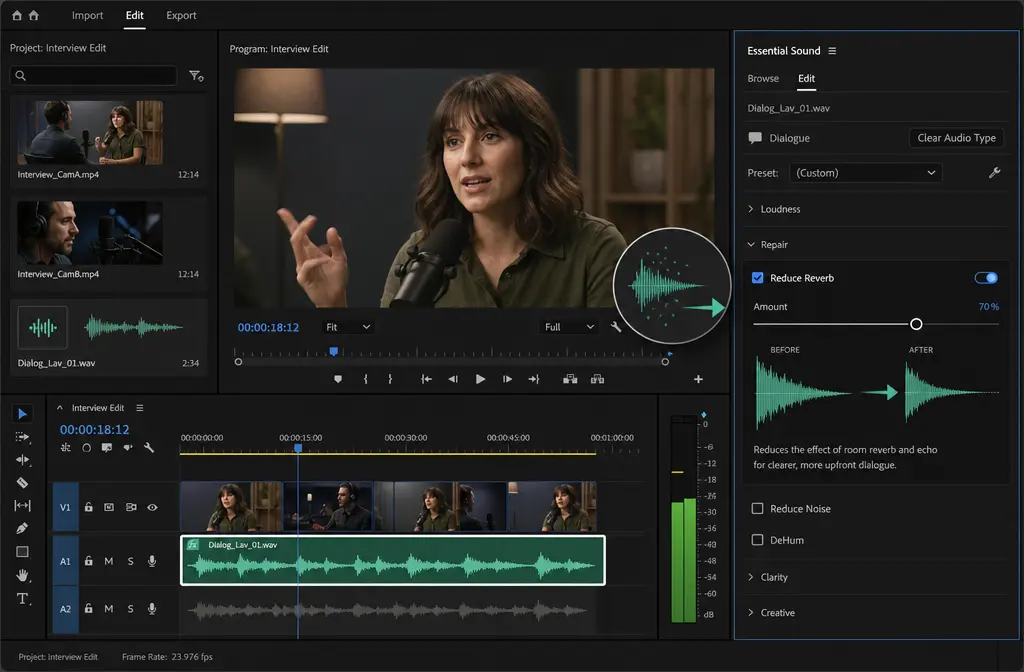
If you are trying to remove echo in Premiere Pro, the good news is that Premiere can often reduce mild to moderate roominess in spoken audio. The less fun truth: what most people call “echo” is usually room reverb, not a true delayed repeat, and Premiere’s tools can only do so much before the voice starts sounding hollow or phasey.
Quick Answer
For most dialogue clips, the fastest way to reduce echo in Premiere Pro is:
- Select the clip.
- Open Essential Sound.
- Tag the clip as Dialogue.
- Under Repair, turn on Reduce Reverb.
- Start with the default setting, then increase gradually while listening for artifacts.
Adobe’s own guidance is to try the default settings first and adjust from there, not to slam the control to the maximum right away. If that quick fix is not enough, use the deeper DeReverb effect from Audio Effects > Noise Reduction/Restoration, then fine-tune Amount, Processing Focus, and gain in Effect Controls. If the result starts sounding thin, swirly, or unnatural, that is usually the point where exporting the audio and cleaning it separately is faster and safer.
What “echo” usually means in Premiere Pro
In everyday editing language, “echo” often means any roomy, distant, reflective sound. But in practice, most bad dialogue inside Premiere is reverb from the room, not a distinct slapback delay. That distinction matters because Premiere’s native tools are designed around Reduce Reverb and DeReverb, not miracle restoration of severely damaged recordings.
This is also why EQ alone does not solve the problem. You can reduce muddiness or boxiness after dereverb, but EQ cannot truly remove room reflections that are already baked into the recording.
Best method by situation
| Situation | Best tool in Premiere | Best for | Main risk |
|---|---|---|---|
| Light roominess on speech | Essential Sound > Reduce Reverb | Fastest fix | Over-processing can dull the voice |
| Mild to moderate reverb that needs more control | DeReverb effect | Editors willing to tune settings | Hollow, phasey artifacts if pushed too far |
| Remaining mud or boxiness after dereverb | Parametric EQ | Cleanup and tone shaping | Can make voice thin if used as a “cure” |
| Speech needs extra intelligibility after cleanup | Enhance Speech | Optional final polish | Mono/stereo limitations and tonal changes |
| Heavy room echo, far-mic phone audio, large reflective space | Export and clean separately | Severe cases | Premiere-native repair may not restore it naturally |
Method 1: The fastest fix in Essential Sound
This is the best starting point for most creators because it is quick, native, and easy to undo.
- Select your audio clip in the timeline.
- Open the Essential Sound panel.
- Assign the clip type as Dialogue.
- Open the Repair section.
- Enable Reduce Reverb.
- Listen before increasing it further.
Adobe specifically recommends trying the default settings first, then increasing gradually while monitoring the sound. That advice is important because dereverb is one of those tools that can sound helpful at first, then quickly cross into obvious artifacts.
- Use this when: the voice sounds a bit roomy, but still fairly clear.
- Do not expect: a close-mic studio sound from bad phone audio recorded across a reflective room.
- Listen for: loss of body, papery consonants, or a swirly texture on sustained words.

Where is Reduce Reverb in Premiere Pro?
It is in Essential Sound > Dialogue > Repair > Reduce Reverb. If you cannot find it, make sure the clip is selected and tagged as Dialogue in the Essential Sound panel.
Method 2: Use DeReverb when you need deeper control
If Essential Sound helps but not enough, step up to the dedicated DeReverb effect.
- Open the Effects panel.
- Go to Audio Effects > Noise Reduction/Restoration.
- Apply DeReverb to the clip.
- In Effect Controls, click Edit to open its controls.
- Adjust Amount, Processing Focus, and output gain behavior.
Adobe’s advanced DeReverb workflow includes control over the amount of processing, where the algorithm focuses its work, and gain handling. That extra control is why this method is better for borderline clips that need more than a one-slider repair.
What is the difference between Reduce Reverb and DeReverb in Premiere Pro?
- Reduce Reverb in Essential Sound is the fastest, simpler workflow for dialogue cleanup.
- DeReverb is the deeper effect with more detailed controls inside Effect Controls.
- In practice, many editors should start with Reduce Reverb and move to DeReverb only if they need more control.
A practical tuning approach
There is no universal magic number, so use a severity-based approach:
- Light reverb: keep changes subtle and stop as soon as the voice moves forward a bit.
- Moderate reverb: use DeReverb more actively, but compare against bypass often.
- Heavy reverb: try a rescue pass, but be ready to stop early and use an exported-file workflow instead.
As you adjust, keep asking one question: Does this sound cleaner, or just more processed? If the second answer starts winning, back off.

When Parametric EQ helps, and when it does not
Parametric EQ can be useful after dereverb, but only for tonal cleanup. It is not a true echo remover.
A good use case is when dereverb improves the room sound but leaves the voice a bit muddy or boxy. In that case, gentle EQ moves can help restore clarity. A bad use case is trying to EQ away the room itself. Reflections are time-based problems, not just frequency problems.
- Use EQ for: boxiness, mud, or a slightly cloudy tone after cleanup.
- Do not use EQ for: removing reflections that are still audible behind the words.
- Order of operations: usually dereverb first, then EQ cleanup.
Should I use Parametric EQ before or after DeReverb?
Usually after DeReverb. If you EQ first, you may end up emphasizing or reshaping the very reflections you are trying to reduce. Dereverb first, then use EQ lightly to tidy up what remains.
Optional finishing step: Enhance Speech for clarity
If the roominess is mostly under control but the voice still needs more presence, you can test Enhance Speech as a final polish. This is optional, not mandatory.
Adobe notes some important limits here: Enhance Speech supports mono and stereo sources, and if you process a stereo clip the output becomes mono. That matters if your project depends on preserving stereo ambience or channel layout.
- Helpful for: making spoken dialogue easier to understand after reverb reduction.
- Not a replacement for: primary dereverb.
- Watch for: tonal changes that feel too “processed” for the project.
Does Enhance Speech help with echo in Premiere Pro?
Sometimes, but indirectly. It can improve perceived dialogue clarity after you reduce reverb, but it is not the main tool for removing room reflections. Treat it as polish, not the first fix.
When Premiere Pro can remove room echo well enough
Premiere usually does best when:
- the speaker is still fairly intelligible
- the room sound is noticeable but not overwhelming
- the mic was not extremely far away
- the recording was not made in a huge, reflective space
In those cases, native tools can often get you from “annoyingly roomy” to “good enough for YouTube, courses, interviews, or podcasts.”
When Premiere is the wrong tool
This is where many tutorials are too optimistic. Premiere can reduce reverb, but it cannot fully restore every bad recording without tradeoffs. The toughest cases are usually:
- heavy room echo
- far-mic phone audio
- dialogue recorded in large reflective spaces
In these cases, pushing DeReverb harder often creates a different problem: the room fades a bit, but the voice turns hollow, papery, metallic, or phasey. That is not a win.
Use this cutoff rule
If you have already tried Essential Sound and then a careful DeReverb pass, but the clip still sounds obviously roomy or the cleanup makes the voice unnatural, stop editing inside Premiere and move to a dedicated cleanup workflow.
Better fallback: export the audio and clean it separately
For many editors, this is the smarter move once native dereverb starts causing damage.
- From Premiere, export the dialogue stem or the affected clip as a separate audio file.
- Clean the saved file in a dedicated tool.
- Re-import the cleaned audio into Premiere.
- Line it up with the original clip and mute or replace the old track.
This workflow gives you a cleaner decision point: instead of stacking more processing inside the timeline, you evaluate whether the repaired file is actually easier to use.
If you are at that stage, our team’s other tool, SimpleClean, can help you clean echoey dialogue after export and then bring the repaired file back into Premiere.
Troubleshooting: common problems and fixes
No audible change
- Make sure the clip is tagged as Dialogue if you are using Essential Sound.
- Increase the setting gradually and compare bypass on/off.
- If the room sound is severe, Premiere may simply not have enough usable signal to recover.
DeReverb makes the voice sound hollow
- Back off the amount.
- Compare against the original more often.
- Try splitting especially bad sections onto duplicate clips so you can use different settings only where needed.
Level drops after cleanup
- Check gain or Auto Gain behavior in DeReverb’s controls.
- Do not compensate by crushing the clip with too much extra processing right away.
- Match loudness after you are happy with the cleanup, not before.
The clip still sounds roomy
- Use dereverb first.
- Then try gentle EQ only to reduce leftover mud or boxiness.
- If the room is still obvious, switch to the export-and-clean workflow.
Should I split problem sections onto separate clips?
Yes, when only certain phrases or camera angles are much worse than others. That lets you apply stronger settings only where necessary instead of overprocessing the whole track.
Prevention beats repair
The easiest echo removal is not needing it later. The research behind this topic is consistent on one point: closer mic placement and softer rooms beat aggressive repair.
- Move the mic closer to the speaker.
- Record in rooms with more soft furnishings and fewer hard reflective surfaces.
- Do a test recording before the real take when possible.
Even a great cleanup chain usually sounds worse than a decent recording captured at the source.
Best-for recommendations
- Best for speed: Essential Sound > Reduce Reverb
- Best for control: DeReverb in Effect Controls
- Best for tonal cleanup after dereverb: Parametric EQ
- Best for extra dialogue polish: Enhance Speech
- Best for severe room echo or far-mic audio: export the file and clean it separately
Final take
If you need to remove echo in Premiere Pro, start simple. Most of the time that means Essential Sound > Dialogue > Repair > Reduce Reverb. If that gets you partway there, move to DeReverb for more control. Use Parametric EQ only as cleanup for tone, not as a cure for reflections. Test Enhance Speech only if the dialogue still needs clarity after the room sound is reduced.
And if the clip still sounds bad unless you push the tools so hard that the voice turns hollow, that is your answer: Premiere has reached its limit. Export the audio, clean it separately, and bring the repaired file back into the edit.
For related Premiere cleanup workflows, see how to remove background noise in Premiere Pro and Adobe Podcast vs Premiere Pro Enhance Speech.
Sources and further reading
- Adobe: Repair dialogue in Premiere - Primary source for Essential Sound Repair controls including Reduce Reverb.
- Adobe: Reduce noise and reverberation in Premiere Pro - Primary source for the quick workflow and Adobe’s advice to try default settings first.
- Adobe: Advanced noise and reverberation reduction in Premiere Pro - Primary source for DeReverb controls including Amount, Processing Focus, and gain handling.
- Adobe: Enhance speech in Premiere - Primary source for the optional Enhance Speech finishing step.
- Adobe: Enhance Speech technical requirements in Premiere - Source for mono/stereo support and stereo-to-mono output behavior.
- Hollyland: How to Remove Echo in Premiere Pro (Step-by-Step) - Used only for supported framing around echo vs room reverb and practical limits in severe cases.
- Music Radio Creative: How to Remove Echo in Premiere Pro - SERP competitor context for the DeReverb-only approach many users see.
- Storyblocks: How to clean up audio in Premiere Pro - SERP competitor context for broader Premiere audio cleanup workflows.