
Quick Answer
Yes, Filmora has built-in noise reduction tools for spoken audio, including Normal Denoise plus targeted controls for hum, wind, and hiss. In practice, Filmora works best on steady noises like fan or HVAC noise, electrical hum, light hiss, and some wind. It usually does less well on room echo, background conversation, traffic under speech, or recordings that already sound hollow or overprocessed.
If you need the fastest workflow, start in Filmora first: select the clip, open the audio controls, enable the denoise option that matches the actual noise, and preview carefully. If your voice starts sounding metallic, dull, robotic, or hollow before the noise is really fixed, export the file and do a second cleanup pass with SimpleClean instead of pushing Filmora harder.
| Filmora is enough when… | Export and clean online when… |
|---|---|
| You hear steady fan noise, HVAC, low hum, hiss, or mild wind. | You hear echo, room reverb, background chatter, traffic, or mixed noise under speech. |
| The voice is already fairly clear and only needs light cleanup. | The voice becomes robotic, metallic, or muffled when Filmora denoise is pushed. |
| You want an all-in-one edit without leaving the timeline. | You already exported an MP4 and want to repair the actual finished file quickly. |
Does Filmora have noise reduction?
Yes. Wondershare’s current Filmora documentation and feature pages describe multiple denoise-related tools rather than one single generic noise remover. The official guide shows options including Normal Denoise, Hum Removal, Wind Removal, and Hiss Removal, along with AI voice-focused enhancement controls. That matters because the best result usually comes from matching the tool to the noise type instead of turning everything on at once.
For speech, that means:
- Normal Denoise: a general starting point for steady background noise.
- Hum Removal: best for electrical-style low hum.
- Wind Removal: for rumble or buffeting from wind.
- Hiss Removal: for high-frequency hiss or static-like noise.
- AI Voice Enhancement / speech clarity tools: for making spoken voice stand out more clearly.
The catch is that speech cleanup is always a tradeoff. The more aggressively you reduce noise, the more likely the voice is to lose natural tone. That is why the best Filmora workflow is usually: start light, use only the relevant tool, and stop as soon as clarity improves without obvious artifacts.
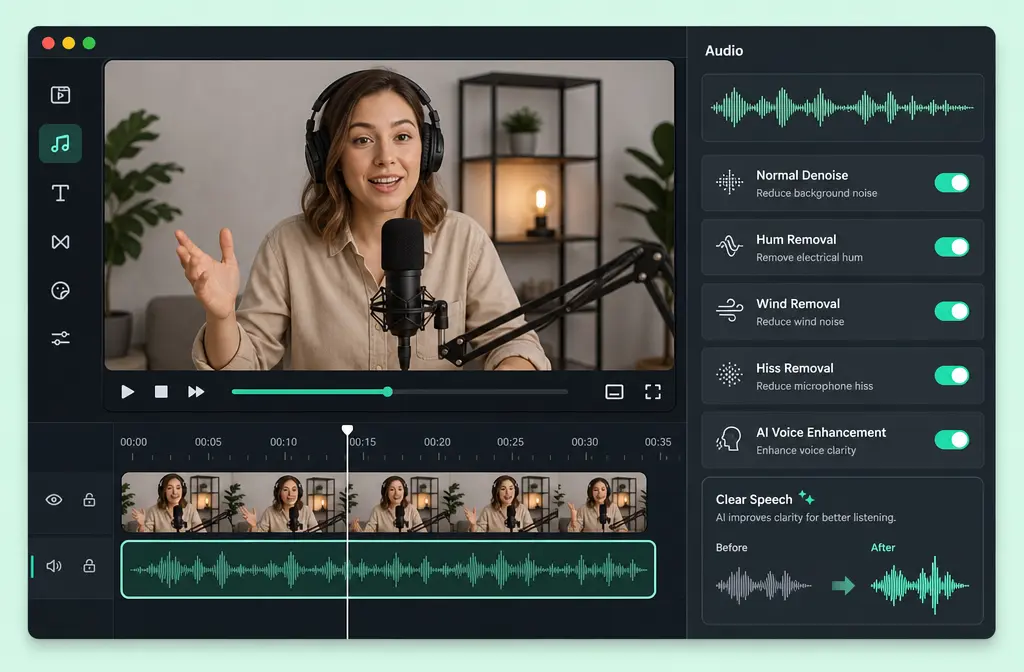
How to remove background noise from video audio in Filmora
Filmora’s basic workflow is straightforward once your clip is on the timeline.
- Import your video or audio into Filmora.
- Drag the clip to the timeline.
- Select the video or audio clip you want to clean.
- Open the Audio settings panel.
- Find the Denoise controls.
- Enable the denoise option that matches your problem: Normal Denoise, Hum Removal, Wind Removal, or Hiss Removal.
- If available in your version, test the AI voice-focused enhancement controls for spoken dialogue.
- Preview the clip before and after, especially on headphones.
- Adjust lightly until the noise is reduced without making the voice unnatural.
- Export when you are satisfied, or export for a second cleanup pass if needed.
This is the practical order most users should follow: first use the specific noise tool, then try voice enhancement only if speech still lacks clarity. If you stack too many fixes too early, it becomes harder to tell which setting is causing the damage.
Best denoise option in Filmora by noise type
The most useful question is not “Which Filmora denoise setting is best?” but “Which setting matches the sound I actually have?”
| Noise problem | Best Filmora starting point | What to expect |
|---|---|---|
| Fan noise / HVAC / steady room noise | Normal Denoise | Usually reduces it well if the voice is already clear. |
| Electrical hum | Hum Removal | Best when the hum is constant and tonal. |
| Mic hiss / high-frequency noise | Hiss Removal | Can help, but too much may dull the voice. |
| Outdoor wind | Wind Removal | Can reduce rumble, but heavy wind often still leaves artifacts. |
| Room echo / reverb | AI voice enhancement as a light test only | Usually only improves intelligibility a bit, not true echo removal. |
| Keyboard noise / background chatter / traffic under speech | Light Normal Denoise or voice enhancement | Often only partial reduction; export-first cleanup is commonly better. |
For most spoken-word projects, Normal Denoise is the safest first move if the noise is broad and steady. Switch to the targeted options only when the noise clearly matches hum, hiss, or wind.
Best starting settings by problem type
The official sources confirm the tool categories, but not a universal “perfect number” for every recording. So the safest guidance is to start conservatively and preview.
- Fan or HVAC noise: start with light Normal Denoise. Increase gradually until the room noise fades without making consonants sound grainy.
- Electrical hum: use Hum Removal first rather than general denoise. If needed, add only a small amount of broader denoise afterward.
- Hiss: use Hiss Removal lightly. Too much often makes voice sound closed-in or dull.
- Wind: try Wind Removal, but keep expectations realistic. Heavy wind often damages speech itself, not just the background.
- Room echo: Filmora may improve speech presence a little, but echo usually is not fully removed in a natural way. This is a strong candidate for exported-file cleanup.
- Keyboard noise: test light denoise only. Short, sharp noises between words often survive timeline denoise surprisingly well.
A good rule: if one extra click of denoise makes the voice worse more than the noise better, back off and switch workflows.
Normal Denoise vs AI Voice Enhancement in Filmora
This is one of the biggest points of confusion in search results.
- Normal Denoise is mainly about reducing the noise itself.
- AI Voice Enhancement or Filmora’s speech clarity tools are mainly about improving the perceived intelligibility and presence of the voice.
That means Normal Denoise is the better first choice for steady noise problems. AI voice enhancement makes more sense when the noise is already somewhat controlled but the speech still feels weak, thin, or buried.
For spoken tutorials, YouTube narration, podcasts, and course videos, the common best order is:
- Use the targeted denoise tool that matches the noise.
- Preview for artifacts.
- Apply voice enhancement lightly if speech still needs help.
If you reverse that order, the enhancement can make the remaining noise more obvious.
What Filmora removes well vs what it usually only reduces
Usually removed or reduced well:
- Steady fan or AC noise
- Constant low hum
- Light hiss
- Some wind rumble
Usually only reduced, not cleanly removed:
- Room echo and reverb
- Background conversation
- Street noise mixed directly with speech
- Keyboard clacks and intermittent handling noise
- Recordings already damaged by aggressive processing
This is why many editors do a first pass inside Filmora, then clean the exported result if the voice still sounds compromised. If your final file is meant for republishing, clipping, or transcription, that extra pass can be worth it. After cleanup, you can add subtitles with Best AI Captions, create multilingual versions with Translate Dub, and distribute the finished content across channels with Mallary.ai.

Should you export WAV, MP4, or MP3 from Filmora before cleaning audio online?
Filmora’s export workflow supports exporting to local files, and its published format support makes MP4, WAV, and MP3 practical options for a second-stage cleanup workflow.
Here is the simplest decision guide:
- Export WAV if you want to clean just the audio and preserve the most editing flexibility.
- Export MP4 if you want to clean the finished video file directly without separating audio from video.
- Export MP3 only if that is already your delivery format or you need a smaller audio-only file and do not need maximum flexibility.
In practical terms, WAV is usually the best choice for audio-first cleanup, while MP4 is the most convenient choice for finished video cleanup.
Use the export-first workflow when:
- Filmora reduces noise but leaves the voice metallic or phasey.
- Echo is still obvious.
- Chatter or room noise remains between words.
- You are already done editing and just need the cleanest publish-ready file.
If that is your situation, a direct second pass with clean exported Filmora audio with SimpleClean is often faster than repeatedly toggling denoise settings in the timeline.
How to export from Filmora for separate cleanup
- Finish your edit in Filmora first, including cuts and timing changes.
- Open Filmora’s export workflow for local export.
- Choose MP4 if you want to clean the final video as-is.
- Choose WAV if you want an audio-first cleanup workflow.
- Choose MP3 only if you specifically need that format.
- Export the file.
- Run cleanup on the exported file rather than continuing to push aggressive denoise inside the editor.
This also makes sense if you need to hand the file off to someone else for final polish, captions, translation, or publishing.
Troubleshooting Filmora noise reduction problems
Why does noise reduction make my voice sound robotic?
This usually means the denoise is too aggressive for the amount or type of noise in the recording. Pull the setting back, disable any unnecessary extra denoise tools, and test the targeted option instead of the general one. Robotic artifacts are especially common when trying to force-remove mixed noise or echo.
Why does my voice sound muffled or dull?
That often happens when hiss removal or broad denoise removes too much high-frequency detail along with the noise. Use less reduction, or export the file and do a cleaner second-stage pass instead of pushing Filmora harder.
Why is there still noise between words?
Steady noise may be reduced during speech but remain obvious in gaps. This is common with room tone, fan noise, and background environment noise. If the residual noise is distracting, export the file and clean the rendered result.
Why is echo still there?
Because echo is not the same thing as steady background noise. Filmora may improve intelligibility, but room reverb usually needs different processing and often remains only partially improved. For this specific problem, see how to remove echo from audio online.
Why does the noise pump in and out?
Pumping usually means the processor is reacting too strongly as speech starts and stops. Lighter settings help. So does switching from general denoise to the specific tool that matches the noise.
When SimpleClean is the better second step after Filmora
Filmora is a good first stop because it is already in your editing workflow. But it is often not the fastest final answer when:
- You already exported the file.
- The recording has echo plus noise, not just one clean problem.
- Background chatter or traffic overlaps with speech.
- Filmora only gets acceptable results at the cost of voice quality.
- You need a cleaner file for captions, dubbing, repurposing, or distribution.
In those cases, using remove background noise from a Filmora export with SimpleClean can be the simpler fallback: export once, clean the real file, then move on to publishing. If you are turning the cleaned result into shorts, social clips, or translated versions, that handoff fits naturally with Best AI Captions, Translate Dub, and Mallary.ai for scheduling and cross-platform distribution.
Best for recommendations
- Use Filmora only if the issue is mainly hum, hiss, fan noise, or mild wind and your voice already sounds decent.
- Use Filmora first, then export if you can improve the noise somewhat but not without hurting the voice.
- Export immediately for separate cleanup if the real problem is echo, chatter, traffic, or a finished MP4 you need to fix fast.
If you also edit in other apps, these guides may help: remove background noise in Premiere Pro, remove background noise in CapCut, and remove background noise in DaVinci Resolve.
Final takeaway
The best way to remove background noise in Filmora is to treat it like a matching problem, not a magic button. Use Normal Denoise for general steady noise, switch to Hum, Wind, or Hiss Removal when the noise clearly fits, and keep settings light enough that speech still sounds natural. For echo, background conversation, mixed noise, or exported files that still sound rough, an export-and-clean workflow is usually the smarter move.
Sources and further reading
- Filmora AI Audio Denoise for Mac guide - Official guide confirming the denoise workflow and available targeted options such as hum, wind, and hiss removal.
- Filmora export to local guide - Official export workflow reference for local exports from Filmora.
- Filmora Mac tech specs - Source for supported/common format references including audio and video export practicality.
- Filmora remove background noise article - Official broad overview of Filmora noise removal capabilities and workflow language users search for.
- Filmora AI Audio Denoise feature page - Official product page describing Filmora’s AI denoise positioning and types of noise it aims to handle.
- Programming Insider Filmora guide outline - Competitor benchmark showing common section coverage and tool names in the SERP.
- AsapGuide tutorial on Filmora background noise removal - Competitor benchmark for beginner workflow expectations and simple tutorial structure.