
If noise reduction made your voice sound metallic, robotic, watery, or swirly, the usual cause is simple: the denoiser was pushed too hard, aimed at the wrong kind of noise, or stacked with other suppression tools. The fastest fix is usually to roll back to the last natural-sounding version, then reapply cleanup more lightly in the right order: remove targeted problems first, use gentle denoise second, and save EQ and compression for later. If the artifacts are already baked into an exported MP4, MOV, WAV, or M4A, it can be smarter to clean a damaged voice recording with SimpleClean instead of stacking more gates, EQ, and suppressors on top.
Quick answer: what a “metallic voice” usually means
In speech cleanup, “metallic” usually means the noise reduction removed too much of the voice along with the noise, leaving behind artificial artifacts. Audacity specifically warns that excessive noise reduction can damage the remaining audio and create artifacts sometimes described as “musical noise,” “bird song,” or “tinkly-bells.” Apple gives a similar warning in Final Cut Pro: aggressive denoising can create artifacts, which is why its Denoiser includes Smoothing controls to make those artifacts less obvious.
That metallic sound is often different from:
- Room echo, which sounds roomy or distant
- Wind damage, which sounds blown-out or thumpy
- Call/VoIP codec damage, which can add harsh, resonant highs before you even touch denoise
- Gate chopping, which cuts words or room tone in and out
So before you keep editing, identify whether you are hearing denoise artifacts, stacked processing, or compression damage already baked into the source.
The 6 most common causes of metallic voice after noise reduction
- Too much broadband noise reduction. Audacity recommends using the lowest effective Noise Reduction setting because too much reduction damages the wanted audio.
- A bad noise profile or noise print. Adobe Audition’s Noise Reduction workflow depends on capturing a representative noise print, and it is intended for constant background noise.
- Stacked suppression tools. Running noise suppression in your OS, meeting app, OBS, and editor at the same time can create robotic speech.
- Compression after already-harsh cleanup. Compression can make denoise artifacts more obvious if the voice was damaged first. Audacity recommends compression after noise reduction, not before.
- Using the wrong tool for the noise type. Audacity says broadband noise reduction is not well suited to irregular noise such as traffic or audience sound.
- Codec or VoIP artifacts mistaken for denoise damage. iZotope notes that metallic, resonant highs in VoIP audio often come from data compression itself, not just from later restoration.

Symptom-to-cause table
| What you hear | What it often points to | Best first move |
|---|---|---|
| Metallic, tinny, robotic speech | Too much denoise or stacked suppressors | Undo to the last natural version and reapply more lightly |
| Watery or underwater voice | Over-aggressive AI suppression or heavy broadband reduction | Reduce suppression amount and add smoothing if available |
| Hollow or phasey tone | Voice frequencies removed with the noise, or multiple processors fighting each other | Disable duplicate cleanup tools and rebuild the chain |
| Pumping noise floor | Gate/expander threshold issues or compression exaggerating the room tone | Retune or bypass dynamics processing |
| Choppy starts and ends of words | Noise gate or expander set too aggressively | Lower threshold or remove gating from the spoken track |
| Harsh, papery, resonant highs in call audio | VoIP or codec compression artifacts | Treat as call-audio repair, not just denoise |
First-aid fix: go back to the last natural version
The biggest mistake is trying to repair overprocessed speech by adding even more processing. In most cases, the best recovery path is:
- Find the cleanest earlier version of the clip.
- Bypass or remove the denoise that caused the problem.
- Listen to the raw noise by itself: is it steady hiss, fan noise, hum, traffic, echo, or call compression?
- Use the right tool for that specific problem.
- Reapply denoise conservatively.
- Stop as soon as the voice sounds natural enough.
That “stop early” part matters. Adobe says Noise Reduction is designed to improve signal-to-noise ratio while keeping quality, typically by about 5 to 20 dB, not to make a bad recording magically silent in every gap.
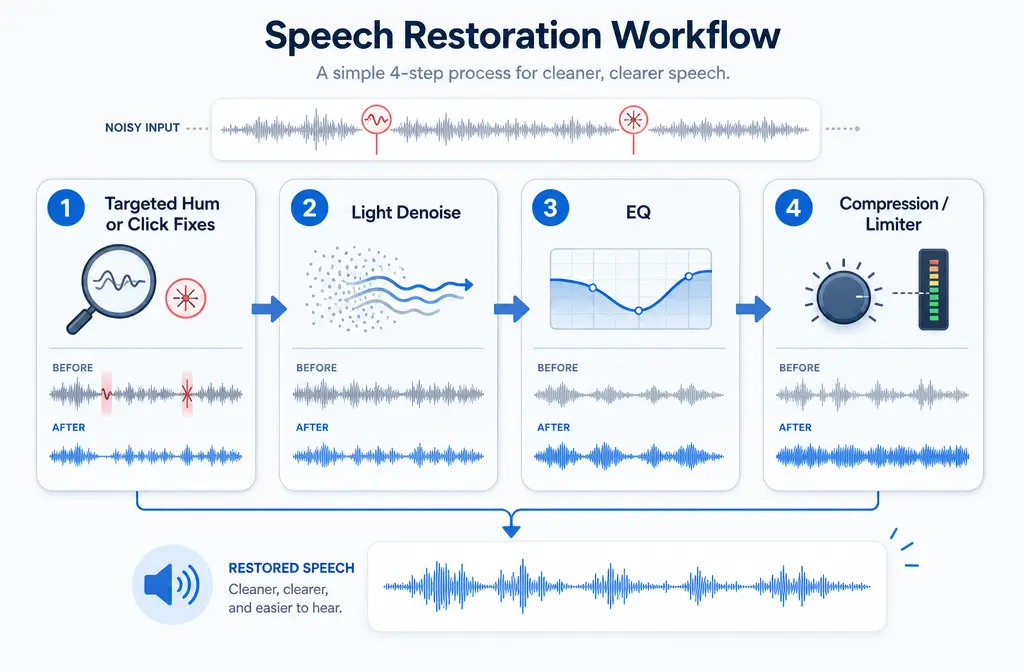
A safer order of operations for speech cleanup
If your voice sounds metallic after denoise, the fix is often less about one magic setting and more about effect order.
- 1. Fix narrow problems first: hum, clicks, and other targeted issues
- 2. Apply broadband denoise second: only if the noise is steady and constant
- 3. Use EQ after denoise: shape tone once the noise floor is under control
- 4. Use compression later: after cleanup and EQ
This order is supported by both Audacity and Apple’s Final Cut Pro guidance. Audacity recommends using tools like notch filtering or click removal before noise reduction, and compression after it. Apple likewise recommends noise reduction before EQ, then compression or limiters afterward.
Best for:
- Steady hiss or fan noise: light broadband denoise
- Single hum frequency: notch or hum removal first
- Clicks: click repair first
- Noise only in pauses: expander may help
- Echo, wind, overlapping voices, or bad calls: separate repair workflow, not stronger denoise
When to use EQ or a notch instead of broadband noise reduction
Broadband denoise is not your first choice for every problem.
- If the problem is electrical hum, use a notch-style approach first.
- If the issue is clicks or pops, use click removal first.
- If the issue is traffic, crowd noise, or irregular background sound, understand that broadband reduction may struggle because Audacity says it is not well suited to irregular noise.
This is one of the main reasons creators get metallic results: they ask a broadband denoiser to solve a problem it was not built for.
Can a noise gate fix metallic voice?
Usually, no.
OBS makes the distinction clearly: Noise Suppression is for removing background noise during speech, while an Expander mainly reduces quieter background sounds. In plain English, a gate or expander helps the gaps between phrases sound cleaner, but it does not repair noisy or metallic speech while you are actually talking.
That means a gate can be useful when:
- your room tone is distracting in pauses
- you want less keyboard or fan noise between words
- your spoken words are already fairly clean
It is the wrong fix when:
- the spoken words themselves already sound metallic
- RNNoise or another suppressor is chewing up consonants
- you are dealing with echo, wind, or codec damage
How to fix settings in common tools
Audacity
- Use Noise Reduction mainly for steady, constant noise.
- Reduce the amount of Noise Reduction if speech sounds artificial.
- Re-check the noise profile. A poor sample can cause worse results.
- Try lower Sensitivity if the tool is eating into the voice, knowing Audacity notes this may reduce voice loss but can increase artifacts.
- Use Frequency Smoothing to make artifacts less objectionable.
- Do click removal or notch-style hum fixes before denoise.
- Apply compression after cleanup, not before.
If you need a broader Audacity workflow, see our Adobe Audition noise reduction guide for a parallel cleanup framework, or tool-specific posts like remove background noise in OBS Studio and remove background noise in Logic Pro for chain-order ideas that also apply here.
Adobe Audition
- Use Noise Reduction only when the background noise is reasonably constant.
- Capture a better noise print from a section that contains noise but not speech.
- If the audio is unusually noisy, move beyond simple noise-print reduction and use Audition’s more advanced offline or spectral repair tools.
- If the artifact is already baked into the file, avoid repeatedly re-processing the same damaged audio.
For a deeper Audition-specific breakdown, read How to Remove Background Noise in Adobe Audition.
Final Cut Pro
- Reduce the Denoiser intensity if speech turns metallic.
- Use the Smoothing controls Apple provides to reduce denoise artifacts.
- Keep your chain in the right order: noise reduction first, EQ after, then compression or limiting.
- If you are still hearing damage, export and clean the file separately instead of adding more timeline effects.
OBS and live chains
- Decide whether you need Noise Suppression or an Expander; they do different jobs.
- If OBS RNNoise makes your mic sound weird, lower your live suppression strategy by removing duplicate processors elsewhere in the chain.
- Check for suppression in your operating system, meeting app, interface software, webcam app, and OBS at the same time.
- Use an expander mainly to control pauses, not to rescue damaged spoken words.
If your recording is already finished, the better path may be to repair robotic audio after OBS recording with SimpleClean rather than trying to mimic a full restoration chain live.
When the problem is not really denoise
Sometimes noise reduction gets blamed for a sound it did not create.
- Room echo: denoise will not remove reverberation cleanly.
- Wind: broadband suppression often leaves ugly speech artifacts.
- Overlapping voices: one speaker is not “background noise” to the other.
- VoIP/call compression: iZotope notes metallic, resonant highs often come from data compression itself.
That matters because the wrong fix usually makes the result worse. If your source came from Zoom, a phone call, or a social app, assume some harshness may already be baked in before you touch denoise.
Export-and-clean workflow for baked-in files
If you already exported the project and now the voice sounds metallic, stop stacking processors in the timeline. Use a simpler decision tree:
- Export the best available version of the file you still have.
- If possible, choose the version with the least destructive processing applied.
- Work from the exported MP4, MOV, WAV, or M4A instead of repeatedly re-rendering the same timeline chain.
- Use SimpleClean when you need a faster, separate cleanup path for spoken audio that already has baked-in problems.
- After cleanup, add subtitles with Best AI Captions if you are turning the repaired clip into short-form content.
- If you need multilingual delivery, use Translate Dub to translate, dub, and caption the cleaned video.
- When the repaired clip is ready to publish across multiple channels, use Mallary.ai to schedule and distribute posts across social platforms from one workflow.
This export-and-clean approach is especially helpful when the file is already baked, the timeline chain is messy, or you are no longer sure which processor caused the damage.
Prevention checklist before recording
- Record the cleanest source you can; restoration is limited.
- Avoid stacking suppression in multiple apps and devices.
- Record a short room-tone sample in case you need a proper noise print later.
- Reduce hum, fan noise, and mic placement problems at the source.
- Test one denoiser at a time.
- Listen for artifacts early instead of after export.
- Use the lightest setting that gets you to “good enough.”
If your main issue is general background noise rather than metallic artifacts specifically, these related guides may help: remove background noise in OBS Studio, remove background noise in Filmora, and remove background noise in Clipchamp.
Bottom line
Metallic voice after noise reduction usually means the cleanup was too aggressive, the noise print was wrong, the tool was mismatched to the noise, or several processors were stacked together. The best fix is usually not “more processing.” It is a lighter redo in the right order, or a separate export-and-clean workflow when the artifacts are already baked into the file.
Sources and further reading
- Noise Reduction - Audacity Manual - Primary source for artifact causes, lowest-effective-settings guidance, sensitivity and frequency smoothing behavior, and recommended effect order.
- Noise reduction & removal - Audacity Support - Support source reinforcing limitations of restoration and the value of prevention.
- Reduce noise with Denoiser in Final Cut Pro for Mac - Apple Support - Primary source for Final Cut Pro denoiser artifact warning and smoothing controls.
- Add audio effects in Final Cut Pro for Mac - Apple Support - Primary source for effect-order guidance: noise reduction first, then EQ, then compression or limiters.
- Reduce noise and restore audio - Adobe Audition User Guide - Primary source for noise-print workflow, constant-noise use cases, and the 5 to 20 dB signal-to-noise improvement range.
- Filters Guide - OBS - Primary source distinguishing Noise Suppression from Expander and clarifying what each can and cannot do.
- Noise Suppression Filter - OBS - Primary source for OBS live noise suppression context and methods.
- 3 Tips for Fixing VoIP Audio in the Mix - iZotope - Expert source explaining metallic, resonant highs in VoIP audio that may be mistaken for denoise damage.