If you are already editing in CapCut, the fastest path is usually to try its built-in noise reduction first. CapCut can help with mild, fairly steady background noise under speech, such as low fan sound, light hiss, or gentle room noise. But if your clip has strong echo, wind, clipping, keyboard clicks, barking, overlapping voices, or background music, CapCut often reaches its limit. In those cases, the better workflow is to export or separate the audio, clean the file with SimpleClean, then re-import it into your CapCut project.
Quick Answer
Yes, CapCut does have noise reduction. The basic workflow is simple: import your video, select the clip, open the audio settings, enable noise reduction, preview the result, and export if it sounds natural. This is usually enough for light, constant noise under dialogue.
CapCut is usually enough for:
- Light fan or AC noise
- Mild hiss
- Low-level room noise
- Steady background hum under clear speech
CapCut is usually not enough for:
- Echo or reverb
- Wind noise
- Clipping or distortion
- Keyboard clicks or sharp intermittent sounds
- Dog barking or sudden background noises
- Overlapping voices or background conversation
- Music under dialogue
If noise reduction makes your voice sound watery, hollow, bubbly, or like it is pumping in and out, back off. That is a strong sign you have pushed speech restoration too far. Adobe and Audacity both warn that stronger noise reduction can remove wanted audio too and create audible artifacts, so previewing and using restraint matters.
Does CapCut have noise reduction?
Yes. CapCut provides built-in background-noise reduction tools in its editing workflow, and CapCut also offers ways to separate audio from video if you want to work on the sound more directly. Its official tool pages also show support for audio-focused workflows, including online audio editing and extracting audio from video files.
That matters because many users do not actually need a full audio editor. If your talking-head clip just has a little HVAC noise or low hiss, staying inside CapCut is faster than exporting, cleaning elsewhere, and re-importing.
But it is important to keep expectations realistic: noise reduction is not the same thing as source separation, dereverb, or declipping. In plain English, reducing steady noise is one job; removing room echo, splitting voice from music, or repairing distortion are different jobs.
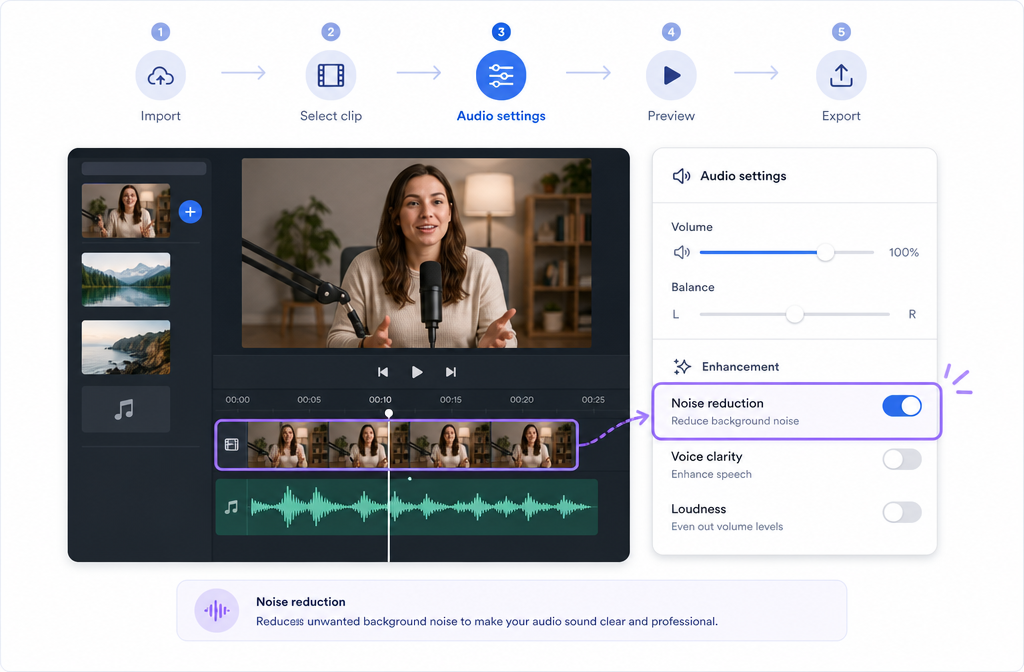
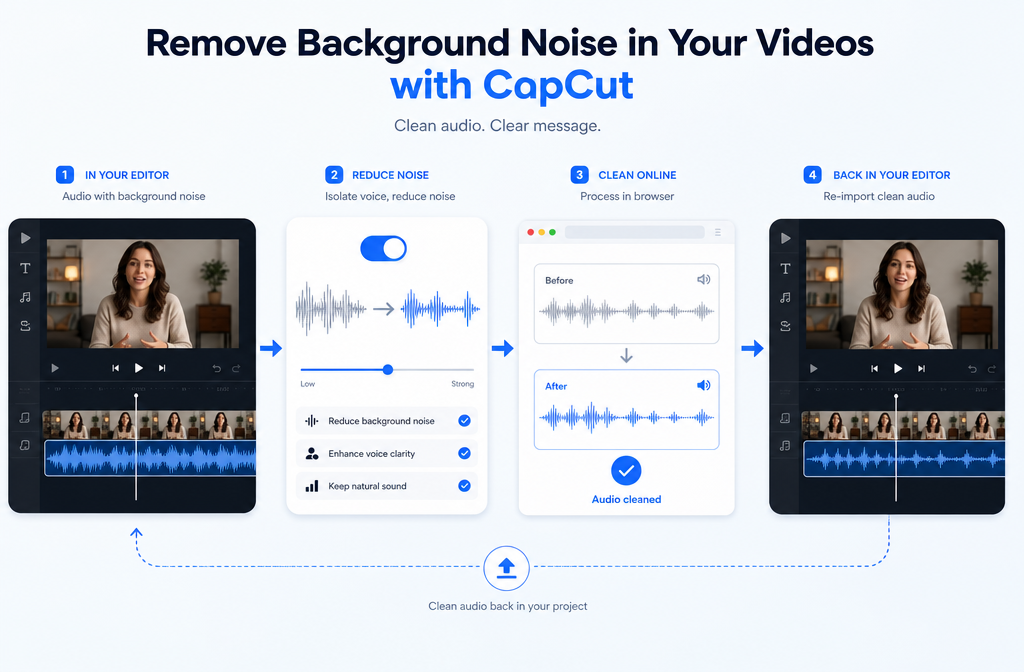
How to remove background noise in CapCut
The exact layout can vary a bit by platform and app version, but the standard process is the same across mobile, desktop, and web: import the file, select the clip, open audio controls, turn on noise reduction, then preview before exporting.
Basic CapCut workflow
- Import your video or audio file. Start a new project and bring in the clip you want to clean.
- Select the clip in the timeline. Make sure the actual media clip is active so its audio controls appear.
- Open the audio settings. Look for audio-related controls in the right-side panel, inspector, or bottom toolbar depending on whether you are on desktop, web, or mobile.
- Enable Noise reduction. Turn it on, or adjust the available amount if CapCut shows a slider or strength setting in your version.
- Preview with headphones. Listen carefully to speech, not just the background. A quieter clip is not automatically a better clip.
- Export only if the voice still sounds natural. If speech starts sounding swirly, underwater, hollow, or choppy, reduce the setting or switch workflows.
Where is noise reduction in CapCut?
- CapCut desktop: Usually in the clip inspector or audio settings after selecting the clip.
- CapCut web: Typically in the right-side editing panel under audio-related controls.
- CapCut mobile: Usually under the clip tools or audio options after tapping the clip in the timeline.
The exact label and placement can change over time, but the pattern stays consistent: select clip, open audio controls, enable noise reduction, preview.
When CapCut is enough
CapCut works best when the unwanted noise is fairly steady and the voice is already recorded clearly. That is the sweet spot for built-in reduction.
Use CapCut first if your audio has:
- A constant fan in the background
- Low AC or HVAC noise
- Soft broadband hiss
- Mild room tone under a close, clear voice
This is especially common for:
- TikToks and reels recorded indoors
- Tutorial voiceovers
- Talking-head videos with a decent phone or USB mic
- Screen recordings with slight computer fan noise
If the noise is subtle and your speech stays intelligible after a light pass, there is no need to complicate the workflow.
When CapCut is not enough
This is the section most CapCut tutorials skip. CapCut can reduce some background noise, but it is not a cure-all. If your recording problem falls into one of the categories below, you will usually get a better result by exporting the file and cleaning it separately.
- Echo or reverb: A roomy, distant, reflective sound usually needs dedicated dereverb-style processing, not just noise reduction.
- Wind: Wind is irregular and often heavy in low frequencies. It does not behave like simple steady hiss.
- Clipping or distortion: If the waveform peaked while recording, noise reduction will not repair that damage.
- Keyboard clicks and sharp transients: These are short and intermittent, not constant background noise.
- Barking, knocks, and sudden interruptions: Again, these are not steady noise beds.
- Overlapping voices or background chatter: Once voices overlap, cleanup becomes much harder than removing hum or hiss.
- Background music under dialogue: This is closer to source separation than simple denoising.
If that sounds like your clip, it often makes more sense to clean exported CapCut audio online instead of forcing CapCut to do a job it was not designed to finish alone.
CapCut vs a dedicated cleaner: which should you use?
| Situation | CapCut built-in noise reduction | Export and clean separately |
|---|---|---|
| Light fan, AC, hiss, soft room noise | Usually enough | Optional if you want a cleaner finish |
| Echo or reverb | Often limited | Better choice |
| Wind noise | Often limited | Better choice |
| Clipped or distorted speech | Not the right tool | Better choice |
| Keyboard clicks, barking, sudden sounds | Often limited | Better choice |
| Background conversation or overlapping voices | Often limited | Better choice |
| Music under dialogue | Usually not the right tool | Better choice |
| Fast social edit with minor noise | Best for speed | Only if CapCut artifacts show up |
Best for CapCut
- You want the fastest fix inside your edit
- The noise is mild and mostly constant
- The voice is already close-mic'd and understandable
- You do not hear obvious artifacts after previewing
Best for separate cleanup
- The voice sounds echoey, distorted, or masked
- The noise is intermittent or complex
- You already tried CapCut and it made speech sound strange
- You want cleaner dialogue before captioning, dubbing, or publishing widely
How to tell you overdid noise reduction
This is the easiest quality check to miss. A lot of users hear “less noise” and assume the result is better. But according to Adobe Audition and the Audacity manual, stronger noise reduction can remove wanted sound and create unnatural artifacts.
Back off the setting if your voice starts sounding:
- Watery
- Bubbly
- Hollow
- Underwater
- Pumpy, where the background seems to open and close between words
A good rule: if the cleaned clip is technically quieter but harder to listen to, the setting is too aggressive.
How to extract audio from video in CapCut
If CapCut is not getting you where you want to go, the next move is usually to separate the audio so you can clean that file directly. CapCut officially supports audio extraction and video-to-audio conversion workflows.
- Open your project or upload the source file.
- Select the video clip.
- Use the audio separation or extraction option. In CapCut, this may appear as extract audio, separate audio, or a similar tool depending on platform.
- Export the extracted audio if needed. If you can choose format, keep the highest-quality option available.
- Clean the audio file separately.
- Re-import the cleaned audio into CapCut.
- Mute or unlink the original noisy track.
- Sync and export your final video.
If CapCut gives you a choice, prefer WAV or another higher-quality export for speech cleanup. If you only have MP3 or compressed audio, it can still be improved, but starting with the best available source is smarter.

The better workflow for tougher audio
When the built-in toggle is not enough, this workflow is usually the cleanest compromise between speed and quality:
- Do your rough video edit in CapCut.
- Extract or export the audio at the highest quality available.
- Use remove background noise from exported video audio in a dedicated browser-based cleanup workflow.
- Bring the cleaned file back into CapCut.
- Replace or mute the original track.
- Finish cuts, captions, music, and final export.
This approach is especially useful if you plan to:
- Add subtitles with Best AI Captions
- Create multilingual versions with Translate Dub
- Repurpose and schedule cleaned clips across channels with Mallary.ai
Cleaner dialogue tends to help every downstream step, including caption accuracy, dubbing quality, and social distribution.
Recommended export guidance
- Keep the highest-quality source you have
- If possible, export WAV or high-bitrate audio for cleanup
- Avoid repeatedly exporting and re-encoding the same compressed file
- Preview the cleaned audio before replacing the original track
- Use headphones when checking speech artifacts
If you are working from a screen recording, meeting recording, or phone video, these related guides may help too:
- clean screen recording audio online
- remove echo from audio online
- remove keyboard noise from audio online
- remove hiss from audio online
Practical decision framework
If you want the shortest answer possible, use this:
- Try CapCut first if the issue is mild, steady background noise.
- Stop and switch workflows if the voice gets weird.
- Export and clean separately if the real problem is echo, wind, clipping, music, or overlapping sounds.
That is the cutoff point. CapCut is excellent for quick in-editor cleanup. It is just not the same category of tool as dedicated speech repair and restoration.
Conclusion
For many creators, CapCut is the right first stop. If your video only has light fan noise, hiss, or a little room noise, the built-in noise reduction can be enough and keeps your workflow simple. But if the recording has echo, distortion, wind, clicks, barking, background chatter, or music under speech, pushing CapCut harder usually creates artifacts before it truly fixes the problem.
In those tougher cases, the smarter move is to export the audio, clean CapCut dialogue after export, and bring the improved file back into your timeline. You keep CapCut for editing speed, while using a dedicated cleanup workflow only when the audio problem actually calls for it.
Sources and further reading
- CapCut — Remove Background Noise from Audio - Supports the claim that CapCut provides built-in background-noise reduction and an in-editor workflow.
- CapCut — Online Audio Editor - Supports CapCut audio-editing context and separate-audio workflow positioning.
- CapCut — Online Audio Extractor - Supports the explanation that users can separate audio from video before external cleanup.
- CapCut — Free Video to MP3 Converter - Supports discussion of extracting or exporting a standalone audio file from video.
- Adobe Audition Help — Reduce noise and restore audio - Supports the explanation that stronger noise reduction can create artifacts and remove wanted sound.
- Audacity Manual — Noise Reduction - Supports preview-first tuning and the warning that aggressive reduction can hurt desired audio.