How to Remove Hiss from Audio Online: Fix Mic Hiss, White Noise, and High-Gain Static Without a DAW
Quick Answer
If your recording has a steady shhhhhh sound behind the voice, that is usually hiss: a broadband noise floor often caused by high gain, mic self-noise, weak source recordings, or noisy electronics. In many spoken-word recordings, hiss can be reduced well when it stays fairly constant and the speech is already understandable. The fastest workflow is usually to upload the file to SimpleClean, preview the cleanup, make light adjustments, and export a cleaner version.
But there is an important limit: aggressive noise reduction can create metallic, hollow, or underwater artifacts, so the goal is usually cleaner speech, not mathematically perfect silence. That tradeoff is consistent with guidance from Audacity and Adobe Audition.
What hiss sounds like
Hiss is typically a steady, high-frequency, noise-like layer sitting under speech. People often describe it as:
- mic hiss
- white-noise-like static
- camera preamp noise
- tape-style hiss
- high-gain background shhh
It is different from a low electrical drone or a clipped, crunchy vocal. That distinction matters, because the right repair depends on the type of noise. Audacity specifically separates constant noise reduction from fixes like notch filtering for hum, instead of treating every noise as the same problem.
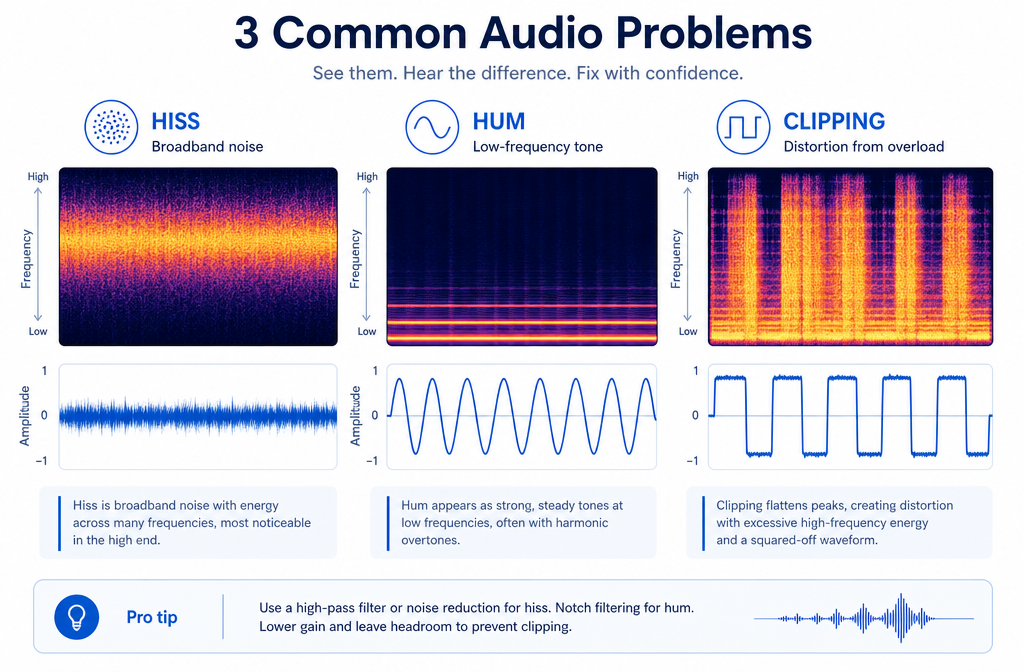
Hiss vs hum vs buzz vs reverb vs crackle vs clipping
If you identify the problem correctly, you will usually get better results faster.
| Symptom | What it usually sounds like | Likely problem | Best first move |
|---|---|---|---|
| Steady “shhh” behind the voice | Broad, airy, constant noise | Hiss | Use hiss or constant-noise reduction |
| Low 50/60 Hz drone | Deep electrical tone, often with harmonics | Hum | Use hum removal or notch-style treatment |
| Harsh electrical tone | Buzzy, tonal, sometimes intermittent | Buzz / electrical interference | Check power, cables, grounding, USB chain |
| Roomy, distant voice | Echoey tail around speech | Reverb | Use de-reverb, not hiss reduction |
| Tiny sharp bursts | Pops, crackles, random snaps | Crackle / static bursts | Use click or crackle repair |
| Crunchy, broken consonants | Peaked, distorted speech | Clipping | Use declipping; denoise alone will not fix it |
If your issue is actually a low electrical tone, read how to remove hum from audio online. If the voice sounds distorted or peaking, start with how to remove clipping from audio online. If the room sounds echoey rather than noisy, see how to remove reverb from video online.
What causes microphone hiss in recordings?
The most common causes are practical, not mysterious:
- High preamp or interface gain: raising gain raises both the wanted signal and the noise floor. Focusrite support explicitly notes that more gain increases the level of noise along with the source.
- Mic self-noise: Shure’s microphone technique guide describes self-noise as hiss that becomes noticeable in quiet, high-gain situations.
- Recording too quietly: if the speaker is far from the mic or recorded at a very low level, boosting later also boosts noise.
- Noisy electronics or USB setups: cheaper interfaces, laptop power conditions, or noisy signal chains can add extra hiss.
- Camera scratch audio: built-in or low-quality preamps often produce more audible hiss than a dedicated recording setup.
This is why two recordings made in the same room can behave very differently: one may have a strong, close voice with only a light hiss floor, while another may have weak speech buried inside that hiss.
Is hiss the same as white noise?
Not exactly, but in everyday creator language they are often grouped together. For spoken-audio troubleshooting, it is reasonable to think of hiss as a white-noise-like broadband noise that stays fairly steady under the voice. The key practical question is less about textbook labels and more about whether the noise is:
- steady or changing
- broadband or tonal
- quieter than the speech or competing with it
If it is a steady broadband layer under clear speech, AI cleanup usually has the best chance of sounding natural.
When AI hiss reduction works best
Online hiss reduction tends to work best in these situations:
- Podcast voiceover: close-mic speech with a consistent hiss floor
- Zoom or webinar audio: understandable speech with light computer or interface hiss
- Camera scratch audio: spoken content where the noise is steady and the voice is still forward enough
- Phone memo: clean speech with a constant high-noise bed
- Archival voice recording: old spoken material with tape-style hiss, where the goal is improved intelligibility rather than full restoration
Adobe and Audacity both support the same core principle: constant noise is more repairable than changing, overlapping problems, and stronger reduction can introduce audible artifacts.
When results are limited
Be cautious if any of these are true:
- the hiss is almost as loud as the voice
- the speech was recorded extremely quietly and then heavily boosted
- the voice is also clipped or distorted
- the room is very reverberant
- other people are talking at the same time
In those cases, cleanup may still help, but the result may sound thinner or less natural. If background voices overlap the speaker, see how to remove background conversation from audio online. If the problem is more general static and crackle, this static-removal guide is the better match.
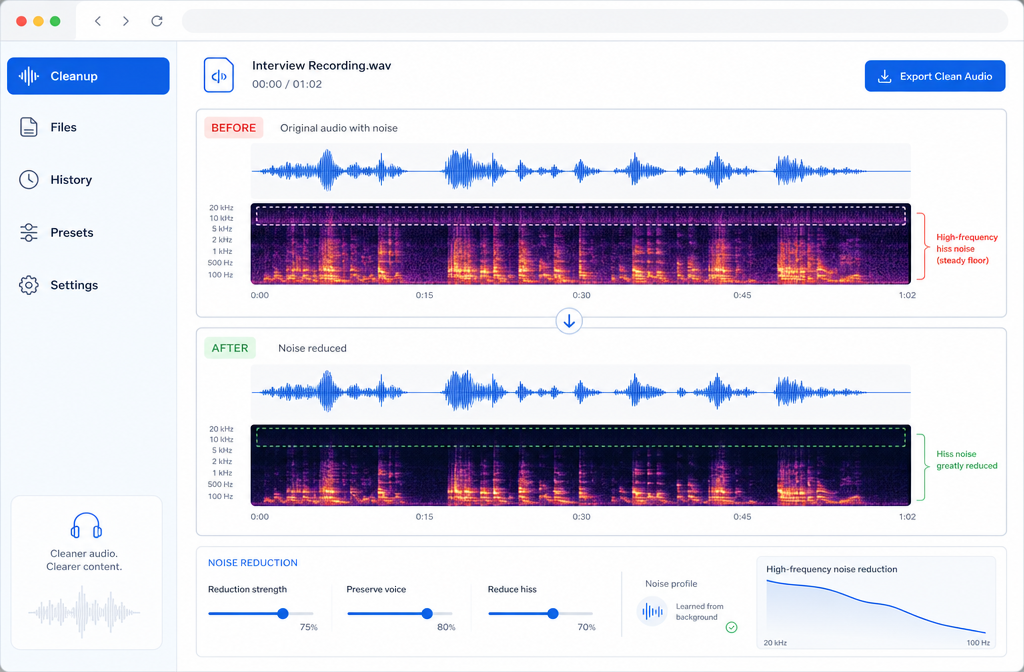
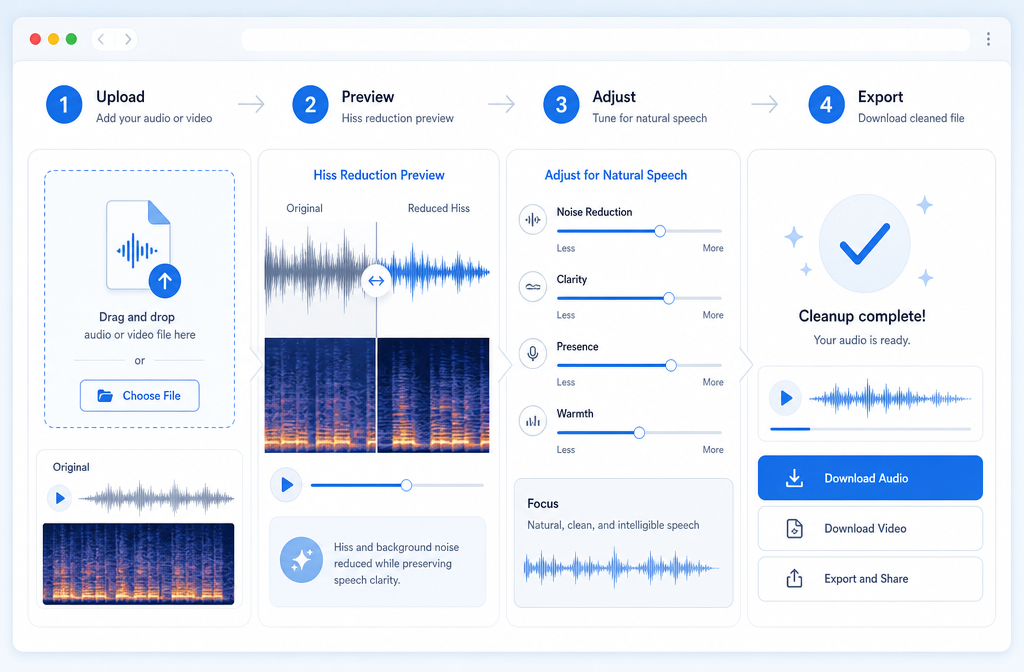
Fast online workflow: remove hiss with SimpleClean
If you want a fast browser-based workflow instead of building a DAW session, this is the simplest approach:
- Upload your audio or video file. Start with the original file if possible, not a repeatedly exported copy.
- Preview the cleanup. Listen to quiet gaps and to important consonants like S, T, and F. Those are the sounds most likely to reveal over-processing.
- Adjust for speech first. Aim for clearer, less distracting noise, not total silence. If the voice starts sounding metallic, hollow, or watery, back off the reduction.
- Export the cleaned version. Keep the original too, so you can compare and choose the more natural take.
That workflow fits the needs of podcasters, YouTubers, course creators, and interview editors who just need to rescue a spoken recording fast. If you are ready to try it, Clean hum and hiss with SimpleClean.
Expected results by recording scenario
| Scenario | Typical hiss source | What you can usually expect | Best-for verdict |
|---|---|---|---|
| Podcast voiceover | High gain, quiet room noise floor, mic self-noise | Often very good cleanup if the voice is close and clear | Best case |
| Zoom / webinar | USB chain, built-in processing, weak mic signal | Good improvement when hiss is steady and speech is intelligible | Usually worth cleaning |
| Camera scratch audio | Noisy camera preamp | Can improve a lot, but may not sound studio-clean | Good for salvage |
| Phone memo | Automatic gain, weak source level | Useful reduction if the speaker is not too far away | Mixed but often helpful |
| Archival voice recording | Tape hiss or older electronics | Cleaner speech is realistic; perfect silence usually is not | Improve, do not over-strip |
Best-for recommendations
- Best for fast spoken-word cleanup: a simple online workflow like SimpleClean, especially when the hiss is steady and you mainly care about speech clarity.
- Best for diagnosing the noise type first: use a quick symptom check. Low drone equals hum; crunchy peaks equal clipping; roomy tail equals reverb.
- Best for old tape-style voice recordings: use gentle reduction and accept some residual hiss if it preserves the natural voice.
- Best for creators repurposing cleaned content: after cleanup, add subtitles with Best AI Captions, create multilingual versions with Translate Dub, and distribute clips across channels with Mallary.ai.
How to remove hiss from video audio online
The same logic applies if the hiss is inside an MP4 or MOV file rather than a standalone WAV or MP3. In practice:
- upload the video
- preview the spoken sections, especially pauses between sentences
- reduce the steady hiss without pushing the voice into artifact territory
- export the cleaner version for editing or publishing
This is especially useful for:
- YouTube talking-head videos
- course lessons
- interviews
- camera scratch audio backups
- screen recordings and webinar replays
If you are cleaning a full video and then publishing clips, captions, and follow-up posts, a practical workflow is: clean the sound first, caption it with Best AI Captions, localize it with Translate Dub if needed, then queue distribution and engagement with Mallary.ai.
Troubleshooting: hiss or something else?
Use this quick decision guide:
- The noise is a steady high shhh: use hiss reduction.
- The noise is a low electrical drone at 50/60 Hz: use hum removal or a notch-style fix, as Audacity recommends for tonal hum problems.
- The voice peaks are crunchy: use declipping first.
- The room sounds distant and splashy: de-reverb is the right tool.
- The noise comes in random snaps or crackles: use click or crackle repair rather than broadband denoise.
Prevention tips so hiss is easier to avoid next time
The best hiss reduction is still good recording technique. The supplied sources support a few consistent habits:
- Get the mic closer to the speaker. A stronger source means you need less gain.
- Lower gain when possible. High gain raises the noise floor along with the voice.
- Record a healthier level. Focusrite user guidance warns that boosting a very quiet recording later also boosts noise; practical target levels around roughly -12 to -18 dB in the DAW are a common gain-staging reference in their documentation.
- Use a quieter mic and interface chain. Self-noise and noisy preamps become more obvious in quiet speech recordings.
- Monitor before recording. Listen on headphones for hiss, hum, fan noise, and keyboard spill before you start.
- Improve mic technique. RØDE’s guidance on background pickup also reinforces the importance of placement and sensible gain.
If your recordings also pick up typing, see how to remove keyboard noise from audio online. For broader cleanup advice, this AI audio noise reduction guide adds more context.
Final takeaway
If you need to remove hiss from audio online, the key is to identify the noise correctly and set realistic expectations. Hiss is usually a steady broadband noise, often caused by high gain, mic self-noise, weak recordings, or noisy electronics. It can often be reduced very effectively in spoken recordings when the voice is already intelligible. It becomes much harder when the file is clipped, reverberant, or extremely noisy.
For most creators, the smartest target is not absolute silence. It is a voice that sounds clearer, less distracting, and more publishable. If that is your goal, a quick browser workflow is usually the fastest path. Try SimpleClean when you need to rescue a noisy spoken recording without opening a DAW.
Sources and further reading
- Adobe Audition Reference PDF - Supports the tradeoff between stronger hiss reduction and distortion or artifacts.
- Focusrite Support — Noise at high gain levels - Supports explanation that increasing gain raises the noise floor along with the signal.
- Focusrite User Guides — How to start mixing - Supports practical gain-staging advice and warning that boosting very quiet tracks amplifies noise.
- RØDE Help — Why Does My Microphone Pick Up Background Noise and Keyboard Clicks? - Supports prevention advice on mic placement, gain, and monitoring background pickup.
- Shure — Microphone Techniques for Recording (PDF) - Supports description of microphone self-noise as hiss in quiet, high-gain recording situations.