
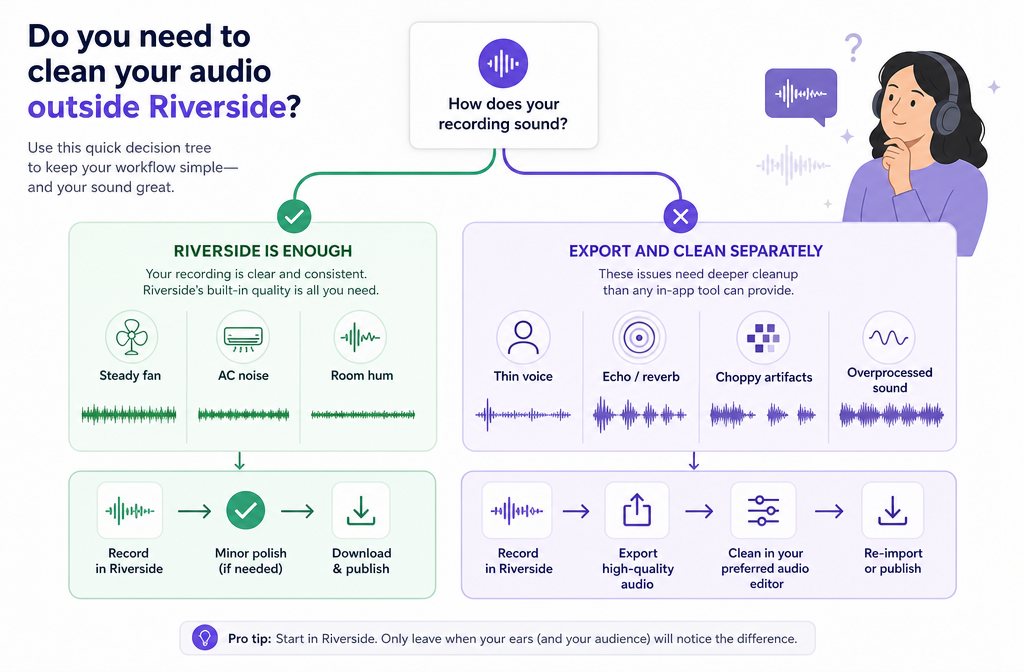
If your Riverside recording has fan noise, AC hum, room tone, or mild background hiss, Riverside may be enough. But not every problem should be fixed with the same toggle.
Quick answer: use Riverside’s built-in tools for steady, predictable noise and light cleanup. Use SimpleClean on the exported file when Riverside’s cleanup makes speech sound thin, choppy, or overprocessed, or when you need more control over echo, hum, clicks, or a problem track after recording.
Riverside currently gives you three different cleanup paths:
- Noise Reduction in the studio: recording-time suppression for ambient room noise like AC, fan noise, or hum.
- Remove Background Noise in the editor: an export option for steady background noise.
- Magic Audio: a separate enhancement workflow that can be applied per track, with intensity control.
The confusion is understandable because all three sound similar, but they solve slightly different problems. The main decision is this: do you want Riverside to handle it inside the recording/editing workflow, or should you export the higher-quality file and clean the actual audio file separately?
Quick Answer: Which Riverside cleanup option should you use?
| Situation | Best option | Why |
|---|---|---|
| Steady fan, AC, or low hum during a live session | Studio Noise Reduction | Built for ambient room noise during recording, but Riverside warns it is irreversible and may reduce some fidelity. |
| Already recorded, and you just need light cleanup on export | Remove Background Noise | Riverside says this is for steady background noise during export. |
| One speaker’s track needs more polish or a more natural balance | Magic Audio on the individual track | You can apply it per track and blend intensity with the original. |
| Voice sounds thin, swirly, choppy, echoey, or overprocessed after cleanup | Export the high-quality track and clean it separately online | Gives you more control and avoids relying on one baked-in suppression pass. |
| Echo from speakers or room reflections | Prevention first, then separate cleanup if needed | Riverside’s echo guidance focuses on headphones and echo cancellation; echo is usually better prevented than “removed.” |
What the Riverside feature names actually mean
According to Riverside’s help docs, these are not the same feature:
- Noise Reduction is used in the studio before or during a session. Riverside describes it as reducing ambient room noise such as AC, fans, and hum while recording.
- Remove Background Noise is used in the editor at export. Riverside says it is best for steady background noise.
- Magic Audio is a separate enhancement option that Riverside recommends in some cases instead of Remove Background Noise, and it can be applied to individual tracks with adjustable intensity.
This naming matters because many users search for “Riverside noise reduction” when they really mean one of three different workflows.

When Riverside is enough vs when to clean the exported file online
A good rule of thumb is:
- Riverside is often enough for light, steady noise: fan whir, AC noise, low room hum, and minor constant background sound.
- Export and clean separately when the result starts hurting the voice more than the noise: thin tone, pumping, choppiness, strange artifacts, harsh consonants, or a hollow result.
This recommendation follows Riverside’s own warning that studio Noise Reduction removes some audio fidelity and texture, and that you cannot add removed sound back later. It also matches the practical caution from Podcast Engineering School: avoid baking in processing unless you truly need it.
Use Riverside only when:
- The noise is steady, not changing constantly.
- The speaker’s voice already sounds reasonably clean.
- You want speed over detailed control.
- You are working inside a normal Riverside recording and export workflow.
Export the file and clean it separately when:
- The built-in cleanup sounds too aggressive.
- The voice loses body or sounds metallic.
- Only one participant’s track is problematic and needs more targeted handling.
- You want to keep a clean original and compare versions.
- You also need help with echo, clicks, or other issues beyond steady noise.
That is where it can help to clean Riverside audio online after download instead of relying on a single export toggle.
How to enable Noise Reduction before or during recording in Riverside
If you know a guest has constant room noise, Riverside lets you enable Noise Reduction in the studio.
- Open your Riverside studio.
- Go to the audio settings for the relevant participant or recording setup.
- Enable Noise Reduction.
- Record as normal.
Riverside says this helps with ambient room sounds like AC, fan noise, and hum. But it also warns that:
- the removed sound cannot be added back later, and
- some fidelity or texture may be lost.
Best for: live sessions where the noise is obvious and constant, and you need a practical fix immediately.
Less ideal for: premium spoken-word recording where preserving natural voice tone matters more than convenience.
How to export with Remove Background Noise in the Riverside editor
If the session is already recorded, Riverside lets you apply Remove Background Noise when exporting from the editor.
- Open the recording in the Riverside editor.
- Start the export process.
- Enable Remove Background Noise.
- Export the file.
Riverside specifically positions this for steady background noise. The same help article notes that Magic Audio is recommended otherwise, which is an important clue: Remove Background Noise is not the universal answer for every bad track.
Best for: quick cleanup on a finished episode or clip when the noise is constant and moderate.
Watch for: speech that suddenly sounds smaller, flatter, or a bit processed after export. If that happens, keep the cleaner-looking export for reference, but also download the higher-quality original track and try a separate file-cleaning workflow.
How to apply Magic Audio to an individual Riverside track
Magic Audio is often the better option when one speaker needs help and you want a more natural result than a broad export toggle.
- Open the recording in the Riverside editor.
- Select the individual track you want to improve.
- Apply Magic Audio to that track.
- Adjust the intensity setting to blend the processing with the original signal.
- Preview the result before final export.
The per-track part is the real advantage here. If one guest has AC hum and another speaker sounds fine, you do not necessarily want a one-size-fits-all treatment on the whole export.
Best for:
- single-speaker cleanup
- more natural control than a blunt on/off export setting
- situations where previewing and adjusting intensity matters
Not always enough for: serious room echo, harsh artifacts already baked into the recording, or files you want to restore outside the Riverside editing environment.
When to export raw or high-quality tracks from Riverside instead
Riverside’s file-format documentation is important here because it confirms you can download more than just one finished export. Depending on the recording and plan, available files can include:
- separate high-quality WAV audio tracks
- separate high-quality MP4 video tracks
- Magic Audio WAV tracks
- backup cloud recordings
If Riverside’s built-in cleanup is close but not quite right, downloading the separate high-quality track is usually the smarter move than repeatedly re-exporting the combined file.
Why export the raw or high-quality file?
- You keep a cleaner source for comparison.
- You can work on the exact problem speaker instead of the whole mix.
- You avoid stacking multiple aggressive processes on top of each other.
- You can clean the audio for publishing, transcription, or replacing audio in your final video.
A practical workflow is:
- Download the Riverside export or separate WAV track.
- Upload the file to remove background noise from a Riverside export.
- Clean noise, hum, echo, or clicks as needed.
- Use the cleaned file in your podcast host, video editor, transcript workflow, or final master.
Echo in Riverside recordings: fix the cause first
Echo is a different problem from fan noise or hum. Riverside’s own troubleshooting guidance focuses on prevention:
- use headphones so your mic does not pick up the other person’s playback
- check echo cancellation settings
- review the recording setup if a speaker is using laptop speakers in the same room as the mic
If your Riverside recording sounds hollow or roomy, noise removal alone may not solve it. Echo often needs prevention more than cleanup.
That is why the decision tree matters:
- steady noise = Riverside cleanup may be enough
- echo or reverb = fix monitoring/setup first, then try separate cleanup on the exported file if needed
For a deeper walkthrough, see our guide on how to remove echo from audio online.
Best option by use case
Best for fast live recording fixes: Studio Noise Reduction
Choose this when you know the environment is noisy and you need Riverside to suppress constant background sound during the session. Just remember that Riverside warns this processing is irreversible.
Best for simple post-export cleanup: Remove Background Noise
Choose this when you already recorded the session and only need a quick export-level reduction for steady noise.
Best for per-speaker polish: Magic Audio
Choose this when you want track-by-track control and the ability to adjust intensity for a more natural result.
Best for difficult files or overprocessed voice: separate online cleanup
Choose this when you want more control over a downloaded WAV or MP4, especially if the built-in result sounds thin, processed, or still noisy. This is also a practical route if you want to prepare the cleaned file for captions, dubbing, or distribution afterward.
A simple Riverside cleanup workflow that avoids common mistakes
- Record as cleanly as possible. Use headphones and reduce room noise before relying on software.
- If noise is obvious during recording, use studio Noise Reduction carefully.
- After recording, try Remove Background Noise for steady noise or Magic Audio on the individual track.
- Compare before and after. If the voice sounds worse, stop there.
- Download the separate high-quality WAV or the exported file.
- Run file cleanup separately if you need more control over hum, echo, clicks, or overly processed speech.
- Publish the improved version. If you are turning the recording into video clips, Best AI Captions can help add captions and subtitles. If you are localizing content, Translate Dub can help translate, dub, and caption the cleaned video. And if you are distributing podcast clips or webinar highlights across channels, Mallary.ai fits naturally for scheduling and publishing those cleaned assets across social platforms.
Troubleshooting: why Riverside noise reduction can make your voice sound thin
Based on Riverside’s own warning, this is not surprising. Noise suppression works by removing parts of the signal it identifies as noise, and some voice texture can go with it.
Common signs the cleanup is too aggressive:
- speech loses warmth
- words sound choppy between phrases
- the voice feels “underwater” or swirly
- breaths and consonants sound unnatural
When that happens, the fix is usually not “add more cleanup.” Instead:
- go back to the original or higher-quality Riverside track
- try Magic Audio on just the affected track if you have not already
- if it still sounds wrong, export the file and clean it separately with a lighter touch
You may also find these related guides helpful: clean podcast audio online, remove hum from audio online, and remove fan noise from audio online.
Bottom line
Riverside does offer useful noise cleanup, but the best option depends on when you are fixing the problem and how severe it is.
- Use studio Noise Reduction for live, steady room noise when convenience matters.
- Use Remove Background Noise for quick export cleanup on steady noise.
- Use Magic Audio when you want per-track control and adjustable intensity.
- Export the high-quality WAV or MP4 and clean it separately when you need more control or when the built-in result hurts the voice.
If your Riverside recording is already done and the built-in tools are not quite getting you there, the safest next step is often to clean the exported Riverside file online instead of pushing the in-app suppression harder.
Sources and further reading
- Enable noise reduction in the studio – Riverside Help Center - Source for what studio Noise Reduction does, examples of steady ambient noise it helps with, and Riverside’s warning that the processing is irreversible and can reduce fidelity.
- What is the difference between Remove Background Noise and Noise Reduction? – Riverside Help Center - Source for clarifying the feature names and preventing confusion between recording-time and export-time cleanup.
- Remove background noise in the editor – Riverside Help Center - Source for the export workflow and Riverside’s note that this is best for steady background noise, with Magic Audio recommended otherwise.
- Apply Magic Audio to individual tracks in the editor – Riverside Help Center - Source for applying Magic Audio per track and adjusting intensity.
- Video and audio file formats: Overview – Riverside Help Center - Source for available Riverside file types including high-quality WAV/MP4 tracks, Magic Audio WAV tracks, and backup cloud recordings.
- I hear an echo in the Studio – Riverside Help Center - Source for echo troubleshooting basics such as headphones and echo cancellation.
- Riverside’s Noise Suppression Feature – Podcast Engineering School - Expert commentary supporting the editorial caution against baking in suppression unless needed.